Document Approval
This sample process demonstrates how linqi can be used to manage and track a document approval workflow. The sequence illustrates the interaction of various process steps – from creation, through functional review, to final quality approval.
The goal of this process is to ensure that every document is reviewed and approved in a traceable manner. It automatically logs which people were involved in the approval to ensure transparency and accountability.
The example is intentionally kept simple to make the basic structure and flow of an approval process easy to understand. The aim is to explain the key functionalities of such a process using a clear and straightforward scenario.
At the end of this section, you’ll get an outlook on how such a process can be expanded and adapted to more complex requirements in real-world use.
Process Overview
The process begins with a form where a document is uploaded and a relevant topic area is selected. Based on the chosen topic, the responsible user group of the corresponding department is automatically assigned.
This automatic assignment is handled via a lookup list where topics and corresponding departments are defined.
The department reviews the document and decides whether to approve it. If the document is rejected, the process ends. If approved, it is forwarded to Quality Control (QC), which performs the final review step.
After the QC review, the document status is finalized — either "approved" or "rejected." The person who initiated the process is then automatically notified of the result.
Such a process in linqi could look like this:
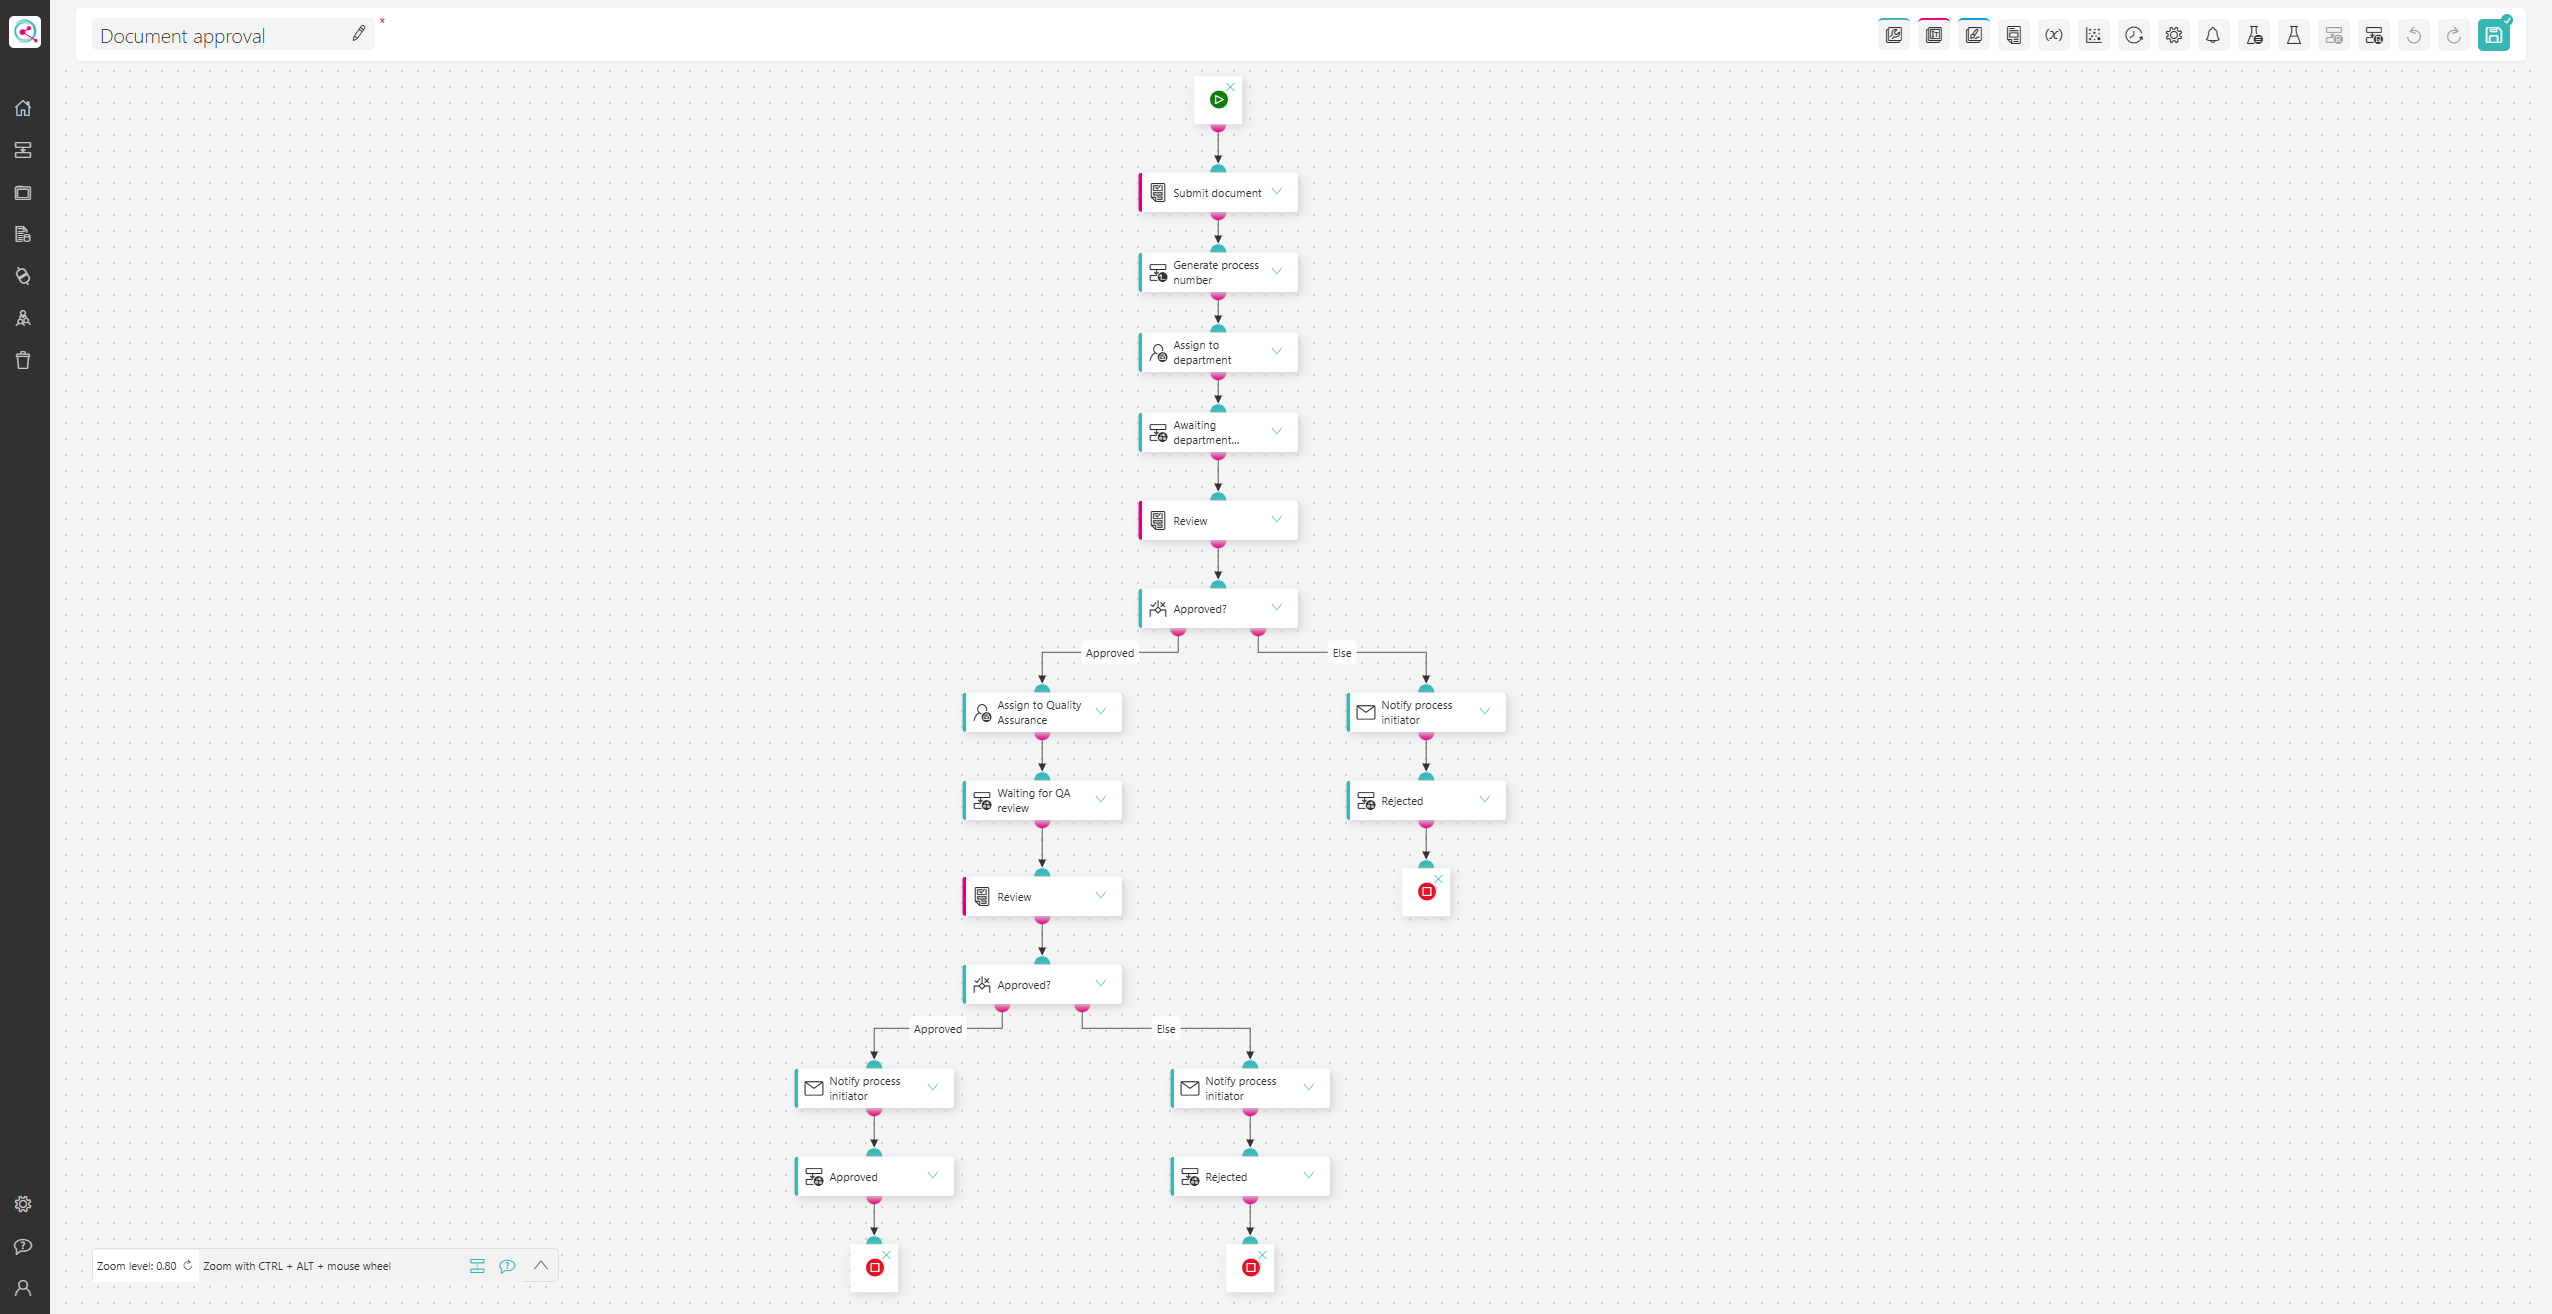
(Screenshot can be clicked to enlarge)
The following sections describe each of these steps in more detail.
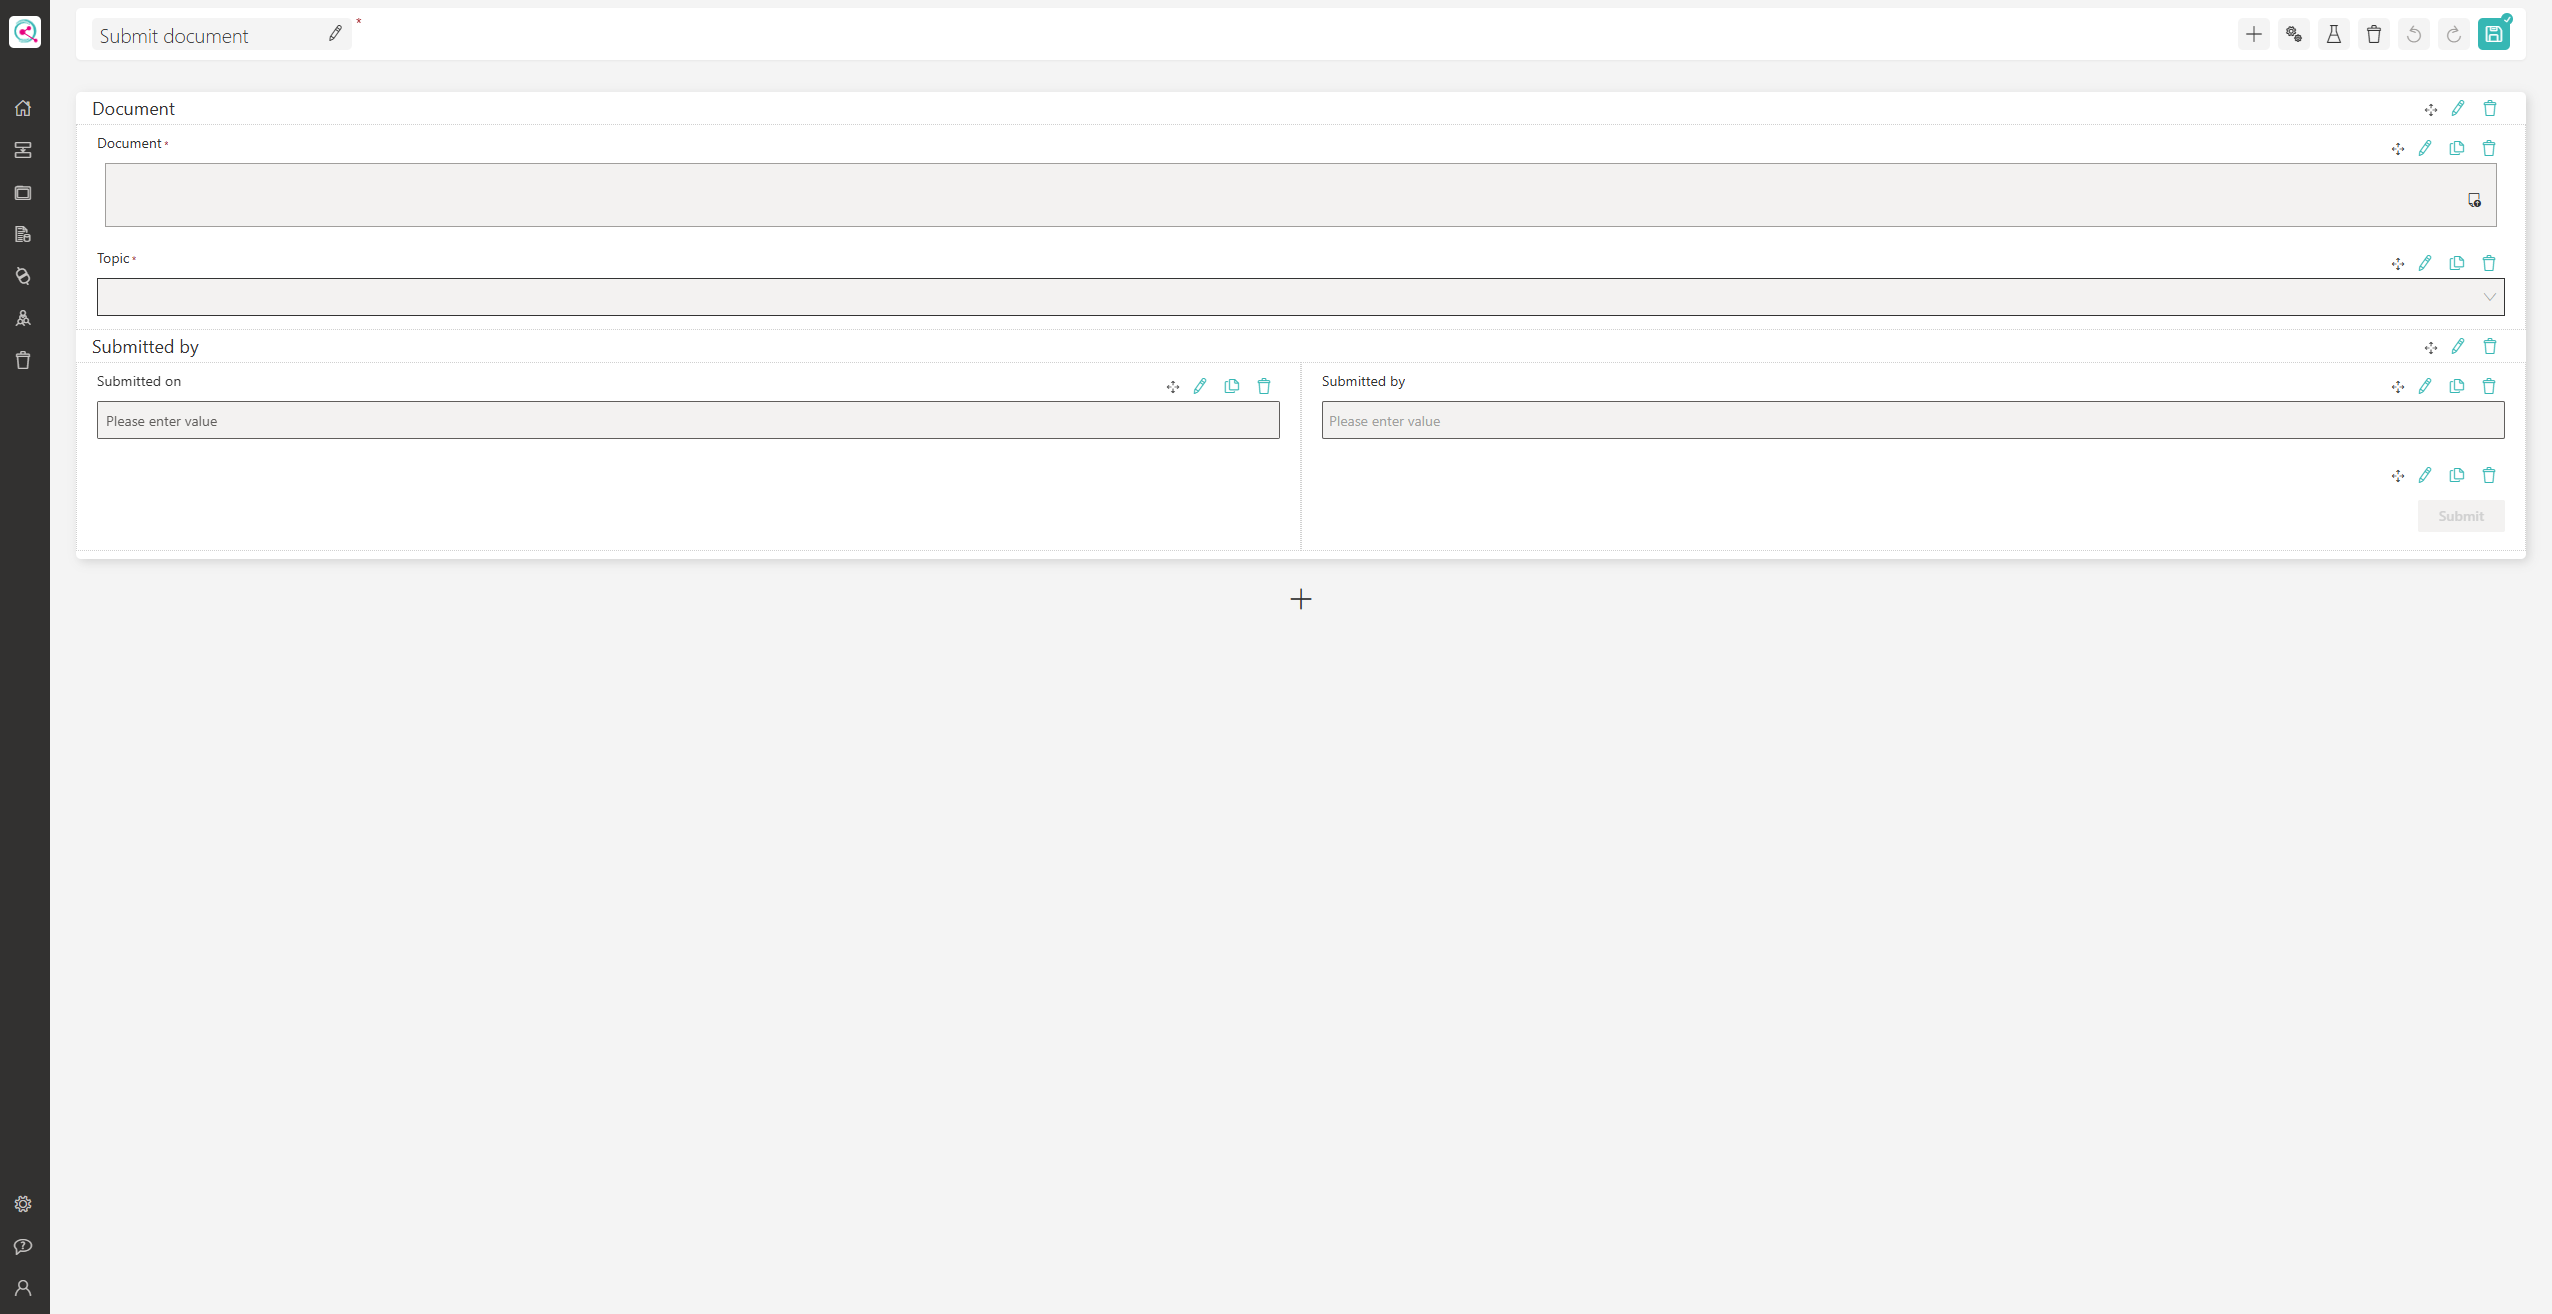
Form: Submit Document
This form mainly includes a File Upload control for uploading the document. Additionally, a Dropdown is used to select the topic area.
To ensure completeness, both fields are marked as mandatory.
It’s worth noting that the topic options are populated via a lookup list:
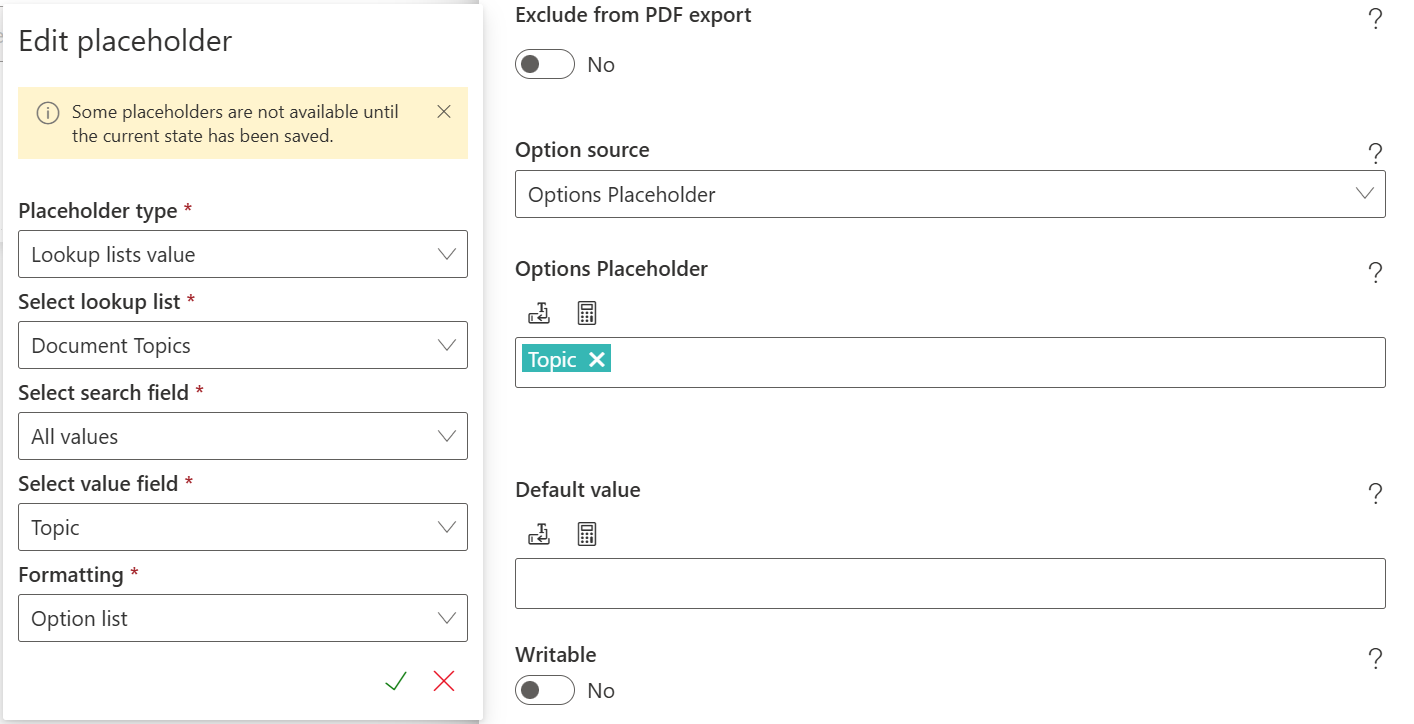
This ensures that any new topic immediately becomes available in the process.
At the bottom of the form, the submission details (who and when) are recorded.
A Single-line Text Field with the Current Date as the default value is used.
Additionally, a People Picker is pre-filled with the currently logged-in user.
Both fields should be set as read-only.
The form looks like this:
(Screenshot can be clicked to enlarge)
Lookup List: Topics
The lookup list used for topic selection looks as follows:

The “Topic” column contains the topic name, and the “Responsible” column lists the people responsible for approval of that topic.
It’s recommended to use Groups to simplify assignment and maintenance.
Example entries could look like this:

With these entries, users could select “Work Instruction” or “Sales” from the dropdown. Of course, you can adapt these to your own needs.
This lookup list approach adds flexibility — responsibilities can be managed centrally and reused across multiple processes.
Forwarding to Department
After the first form is submitted, the following Process Actions are executed:
- Generate Process Number:
Creates a unique process number to make it easier for participants to refer to an ongoing process. No further configuration is needed. - Assign Department:
Using an Assign Process Owner action, the responsible department is assigned. The lookup list is used to grant access to the appropriate group based on the topic selected in the previous form. Configuration looks as follows: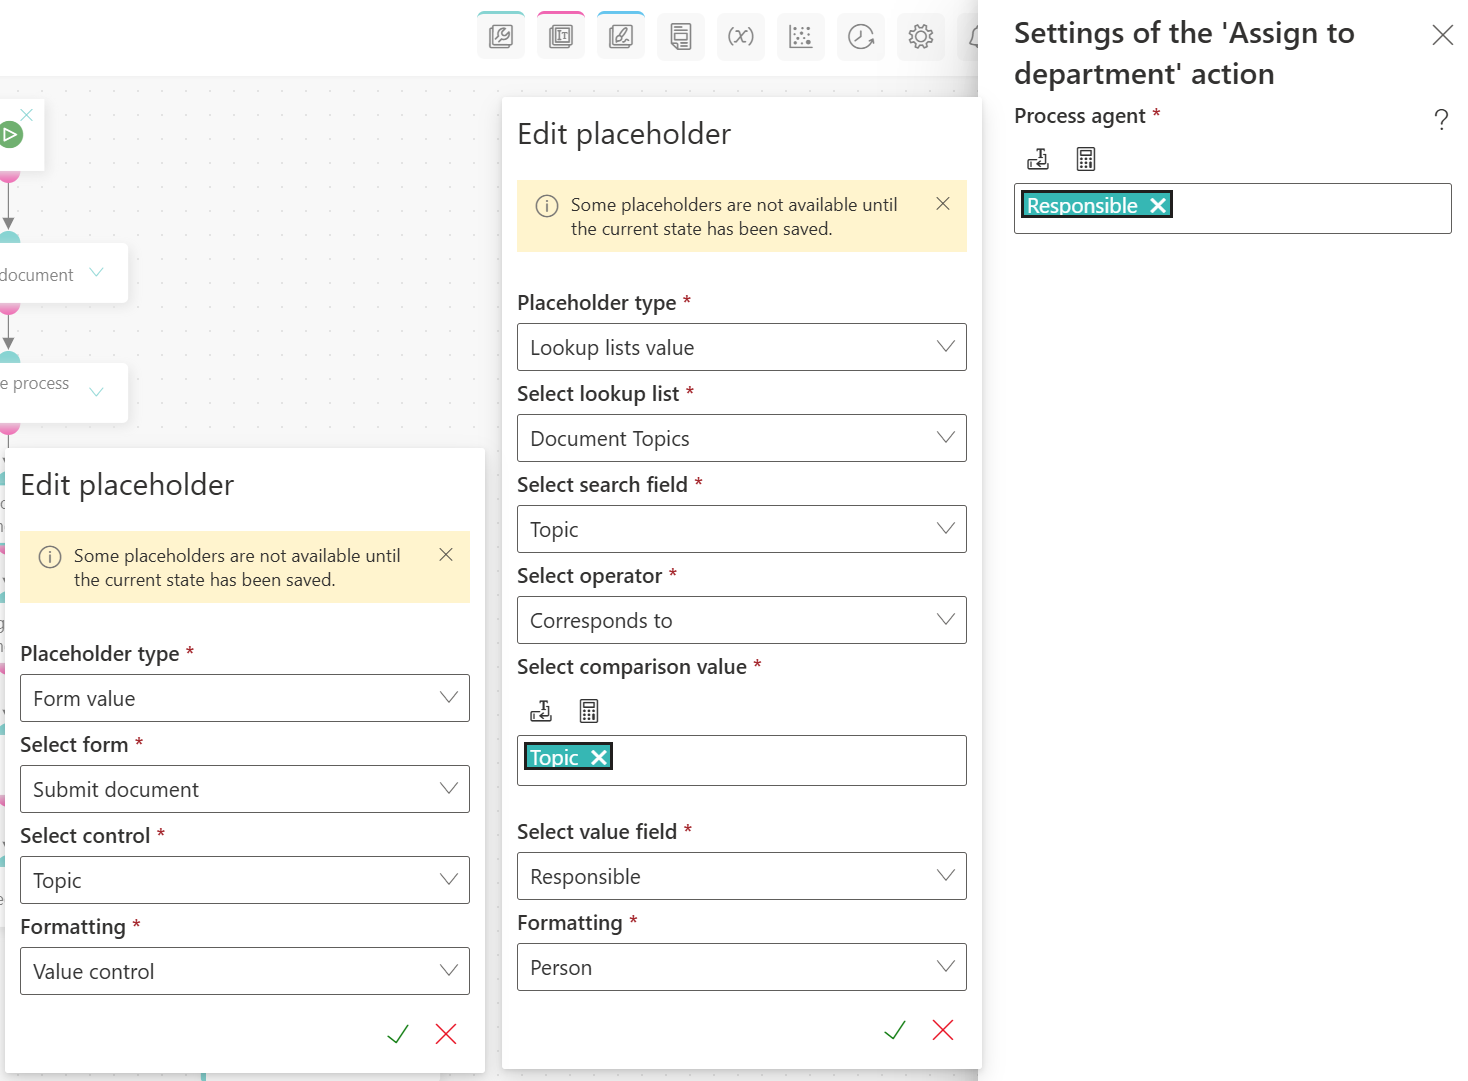
Here, the form value determines which lookup list entry is loaded to assign the configured group. - Wait for Functional Review:
The Change Status Name action sets the status to Waiting for Functional Review, which helps filter processes on dashboards.
After these actions, the process continues to the Review form.
Form: Review
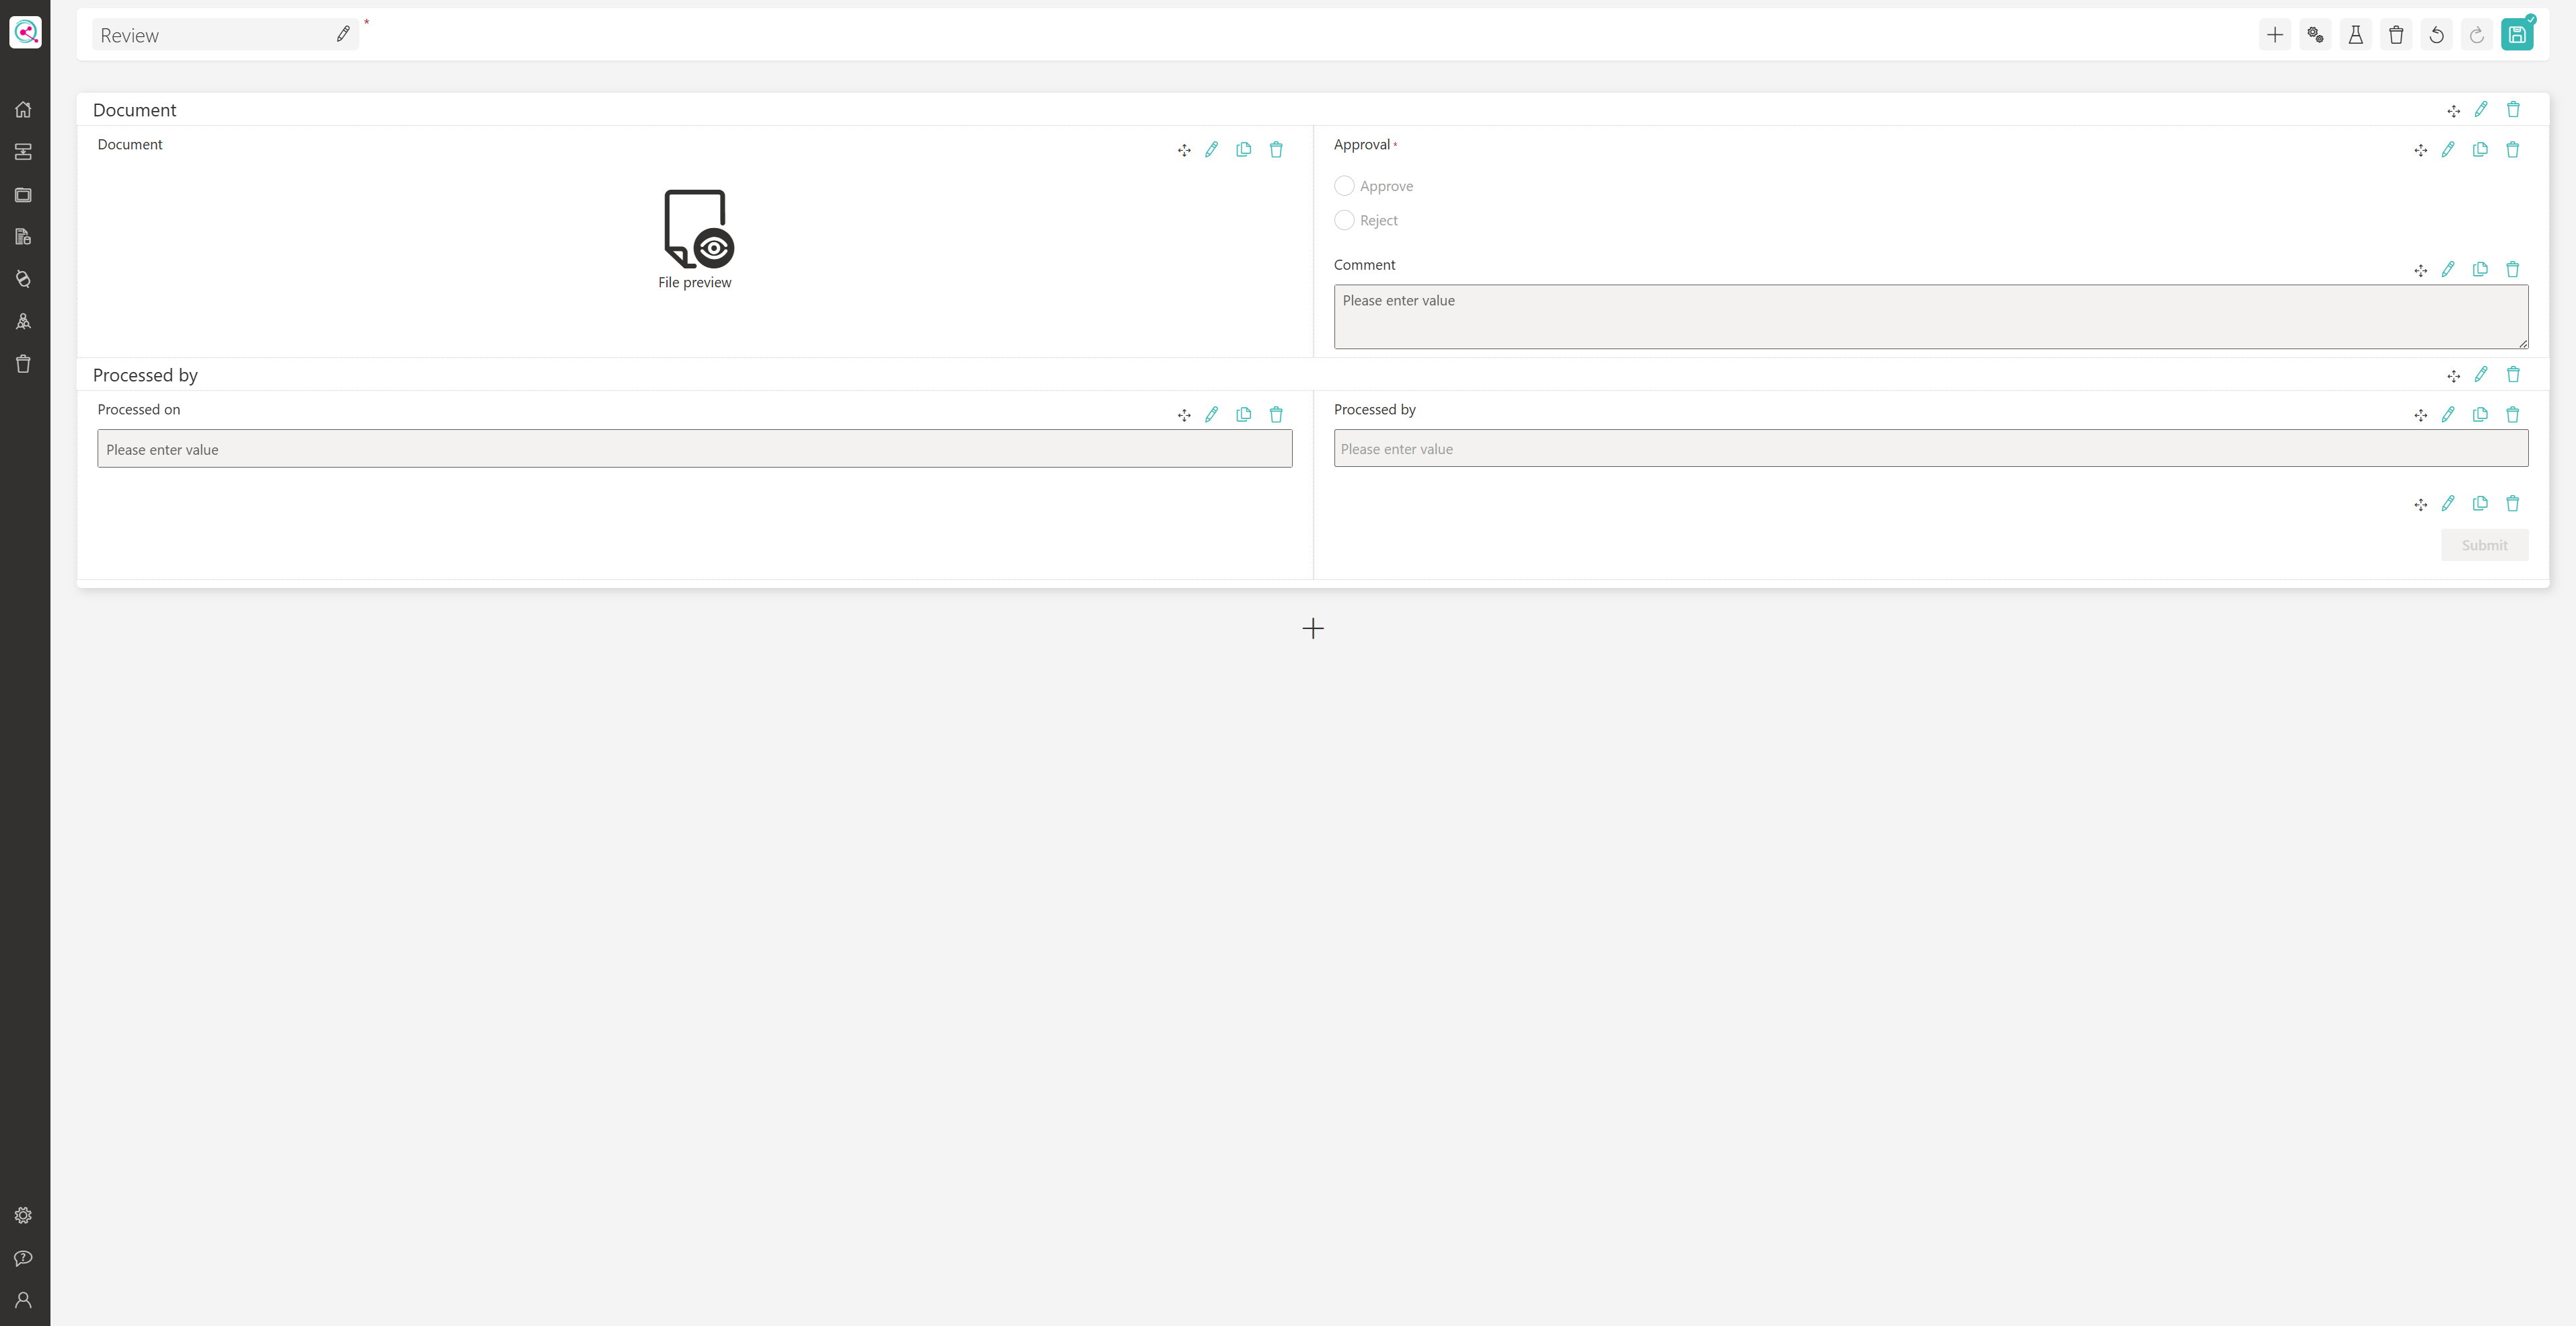
(Screenshot can be clicked to enlarge)
In this form, both the department and later the QC can review and either approve or reject the document. The following controls are used:
- Document:
A File Viewer element displays the document on the left side so reviewers can view it directly in the browser.
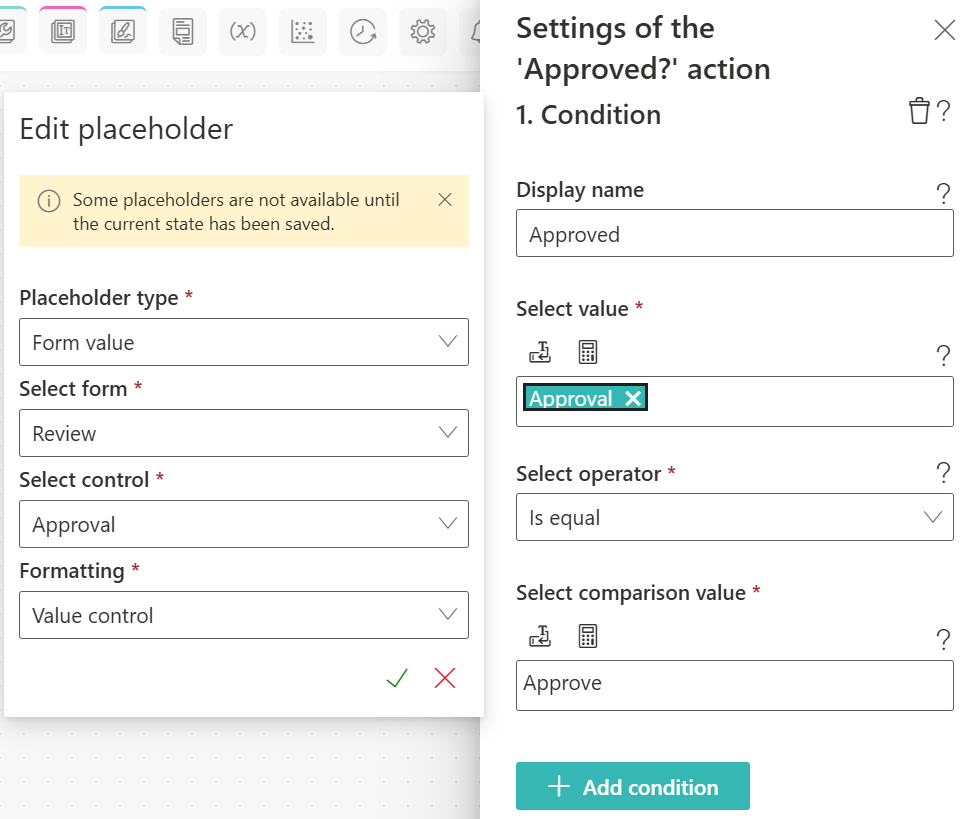
It assumes that documents are in PDF format. - Approval:
An Option Field is used to select whether the document is approved or rejected. - Comment:
A Multiline Text Field allows reviewers to provide a comment. This field is set as required using a Rule when the document is rejected.
At the bottom, similar to the first form, details on who made the decision are recorded.
The rule to make the comment field required when a document is rejected looks like this:

Forwarding to QC
Once the review form is submitted, a condition checks whether the document was approved. Configuration of the conditional action looks like this:
If rejected, an Email Send action notifies the process initiator and a Change Status Name action sets the status to “Rejected.”
If approved, a similar sequence is performed for the QC review.
QC Review
The QC review works the same way as the departmental review:
- Assign QC:
Through the Assign Process Owner action, the QC group is assigned using a Fixed User / Group placeholder. - Wait for QC Review:
The Change Status Name action sets the status to Waiting for QC Review. This helps for filtering in dashboards.
The same review form is reused for the QC to perform its check.
The same condition as in the departmental review determines whether the document is approved or rejected. This works because a Form Placeholder always references the latest value of the form, ensuring that the condition uses the QC’s decision.
Afterward, an Email to the Process Initiator is sent, and the status is updated.
Conclusion & Next steps
Since processes are stored in an audit-proof manner, this workflow ensures that it’s always clear who approved a document and when.
Additionally, employees no longer need to know who is responsible for which topic — this logic is now handled automatically by the process. This is especially helpful when responsibilities change.
It’s also possible to connect this approval flow with external systems. For example, a document approval process could automatically be triggered when a file is uploaded to a SharePoint document library.
Instead of the first form, you would use a SharePoint Event action to start the process.
Decisions could then be written back to SharePoint using a SharePoint Item Update action.