Create dashboard
Dashboards in linqi represent the start pages that users see when opening the application or under the following navigation point:
You can create several dashboards to provide the different groups of people with the information they need. For example, you can create a dashboard for the management to give the management an overview of the various processes and key figures, while the specialist departments can be given a detailed overview of the processes for which this specialist department is responsible.
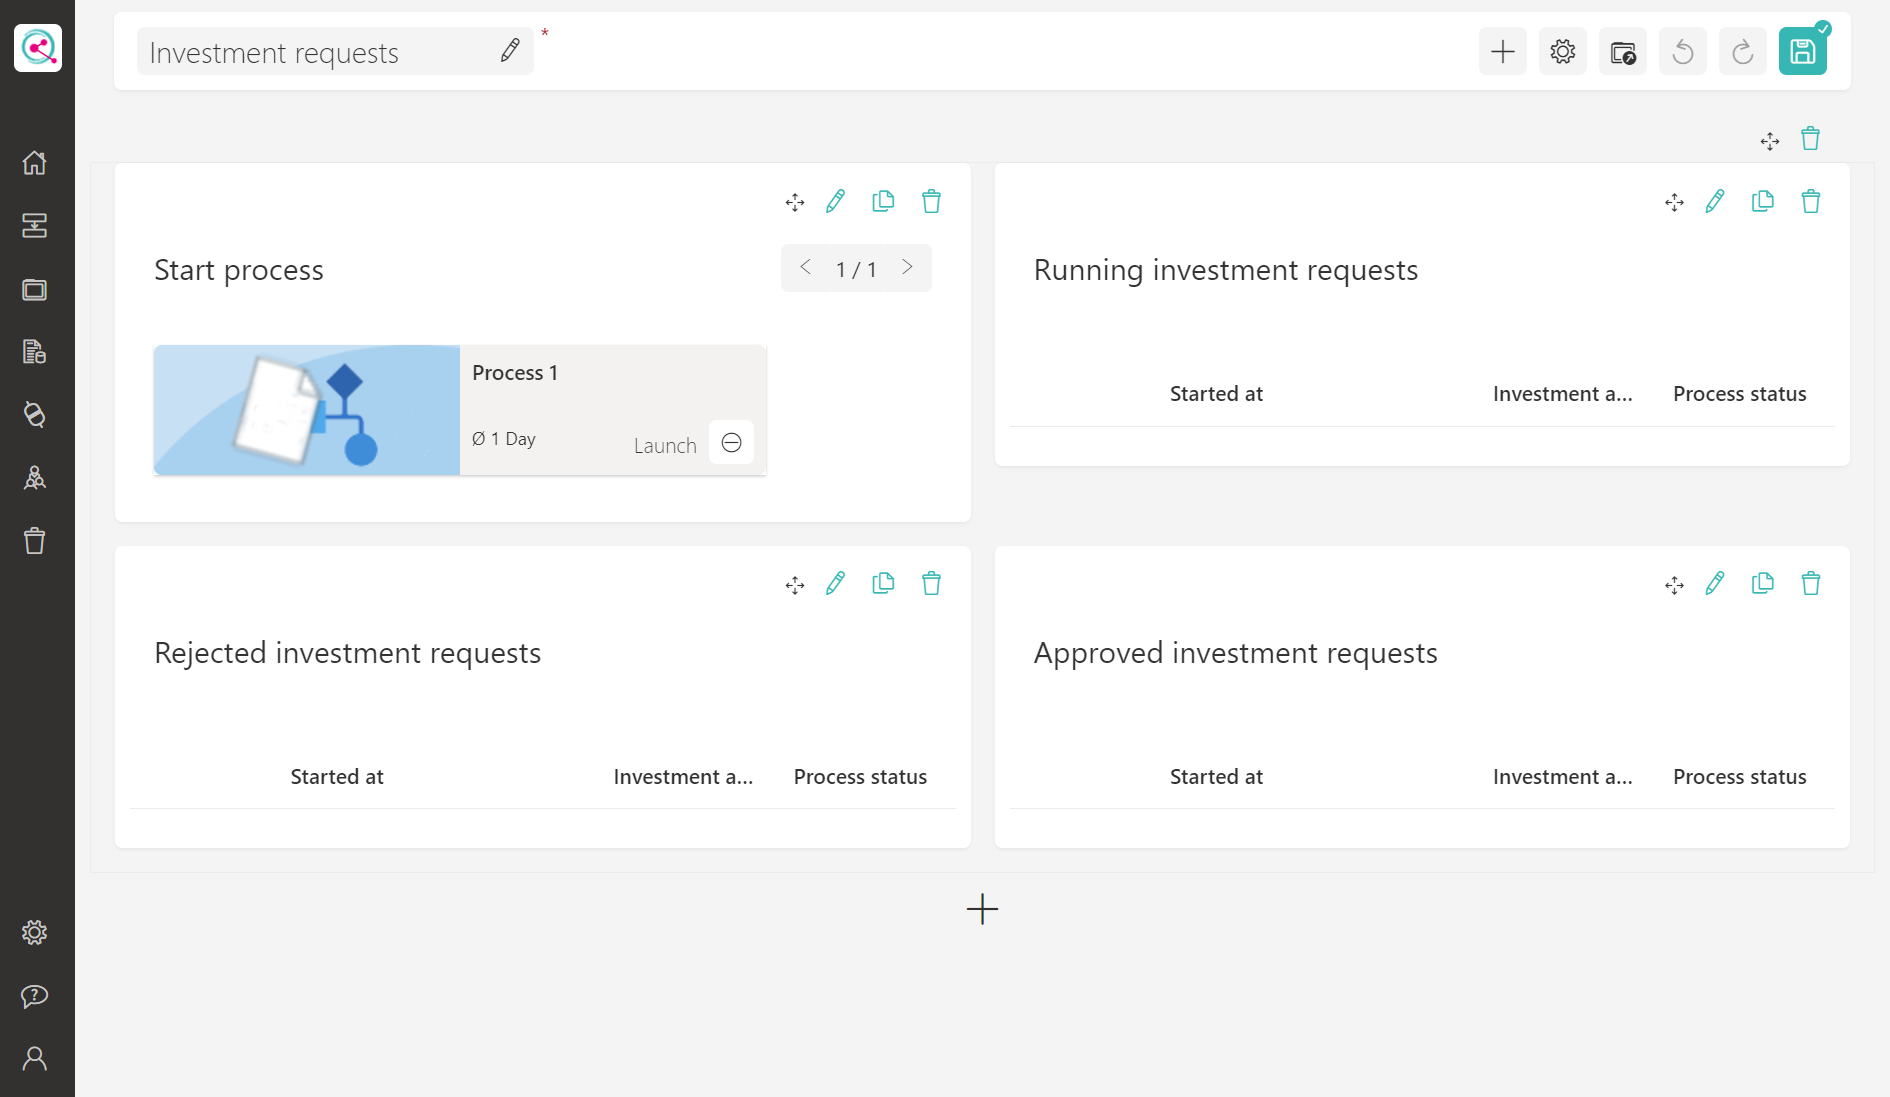
For the quick start, we will create a dashboard that makes it possible to start a process and provides an overview of the processes. To create this dashboard, switch to the list of dashboards via this navigation entry:
If you cannot see this navigation point, you are missing a business unit with process editing rights or you have not yet reloaded the page. Go to the previous step to create a business unit.
Once you have opened the process list, you can create a new dashboard via the plus in the upper right bar of buttons.
Dashboard Designer
The Dashboard Designer is basically very similar to the Form Designer. At the top left you can assign the name of the dashboard, on the right side you will find the buttons with the various functions. To create the dashboard, proceed as follows:
- Enter investment requests in the name at the top left
- Use the plus in the middle of the dashboard designer to insert a section with a two-column layout
- Use the plus button at the top right to open the list of available dashboard elements
- Drag and drop a Start process element into the left-hand column
- Drag and drop a process table into the right-hand column
- Close the list of available dashboard elements via the X
- Open the settings of the Start process element via the edit button on the right-hand side ()
- Enter e.g. Start process as the title
- You can restrict which processes the users can start here by (de)selecting Processes. If you do not select any processes there, the users can start all processes to which they have access.
You can therefore select the investment application we have created here. - You can apply the configuration via Apply
- Open the settings of the process table element via the edit button on the right-hand side ()
- Enter Current investment applications as the title
- Via Processes (un)select the investment request
- In the column configuration, click three times on Add column to insert three columns in the table.
- For the first column, enter the name Started on
- Insert a placeholder for the process start date as the value for the first column (Type of placeholder: Process values, Select value: Process start date, Formatting: Date with time). In this way, you can determine which values can be displayed in the table column.
- For the second column, enter the name Investment amount
- Insert a placeholder for the investment amount from the first form as the value for the second column (type of placeholder: form value, select form: Investment request, Select control element: Amount of investment (€), Formatting: Numerical value). This causes the value entered in this form to be displayed in the table.
- For the third column, enter the name Process status
- Insert a placeholder for the process status as the value for the third column (type of placeholder: Process values, select value: Process status, Formatting: Text value). This placeholder corresponds to the value that was defined via the Change status name action.
- In the standard sorting, select Started on as the column and select Descending as the sorting direction. In this way, the newest processes are always at the top.
- Add a new filter in the filter configuration area
- Select the process status column. In this way, we can only display processes that do not yet have the status Approved or Rejected and are therefore still running.
- Select Not equal as the operator
- As a comparison value, we would like to filter for Approved or Rejected. To specify two values, you must separate them with |. Therefore, enter Approved|Rejected as the comparison value.
- Click on Apply to apply the configuration
- Save the dashboard using the button at the top right
We have now given users the option of starting a new investment application and finding and opening the ongoing processes via the table. However, it is often also helpful to see the completed processes.
Instead of building such a table from scratch, you can also duplicate existing elements in linqi using the copy button (). In this way, you can copy the existing table and only have to adjust the name and filter.
Copy the table twice and drag and drop one of the tables into the left-hand column using the Move button ().
Now edit the copied, moved table again using the Edit button (). Change the title to Rejected investment applications.
In addition, change the filter operator to Is equal and the comparison value to Rejected. Confirm the new configuration with the Apply button. In this way, all rejected investment applications are now displayed in the table.
Similarly, you can adjust the other copied table to change the title to Approved investment applications. You must also change the filter operator to Is equal and the comparison value to Approved. Then save the dashboard.

Testing
The process and the associated dashboard are now complete and the people who are members of your business unit can now use it. You can test this yourself by switching to the start page or opening the dashboard from the Dashboard Designer with the following button:
In the next step, we will carry out various small optimizations, which, however, have no direct effect on the process execution.