Create form
In the first form of the investment application, the users will specify the details of the investment.
The basic structure of the form designer is very similar to the structure of the process designer. Here, too, you will find a text field on the top left-hand side to assign the name of the form and the buttons for the various functions on the right-hand side.
To begin with, assign a name to the form, e.g. investment application, and save the form using the save button on the right-hand side.
Insert section
linqi forms are based on a column layout. This allows us to customize the layout of a form so that it can be filled out well on a computer as well as on mobile devices.
This means, for example, that controls that are arranged next to each other are arranged below each other on a cell phone.
You can now insert a section using the plus in the middle. To begin with, we can select a single-column section here.
Insert control element
Once you have inserted a section, you can insert controls into the form. To do this, click on the plus button at the top right of the form designer.
The list of available controls then opens. You can now simply drag and drop these into the newly inserted section.
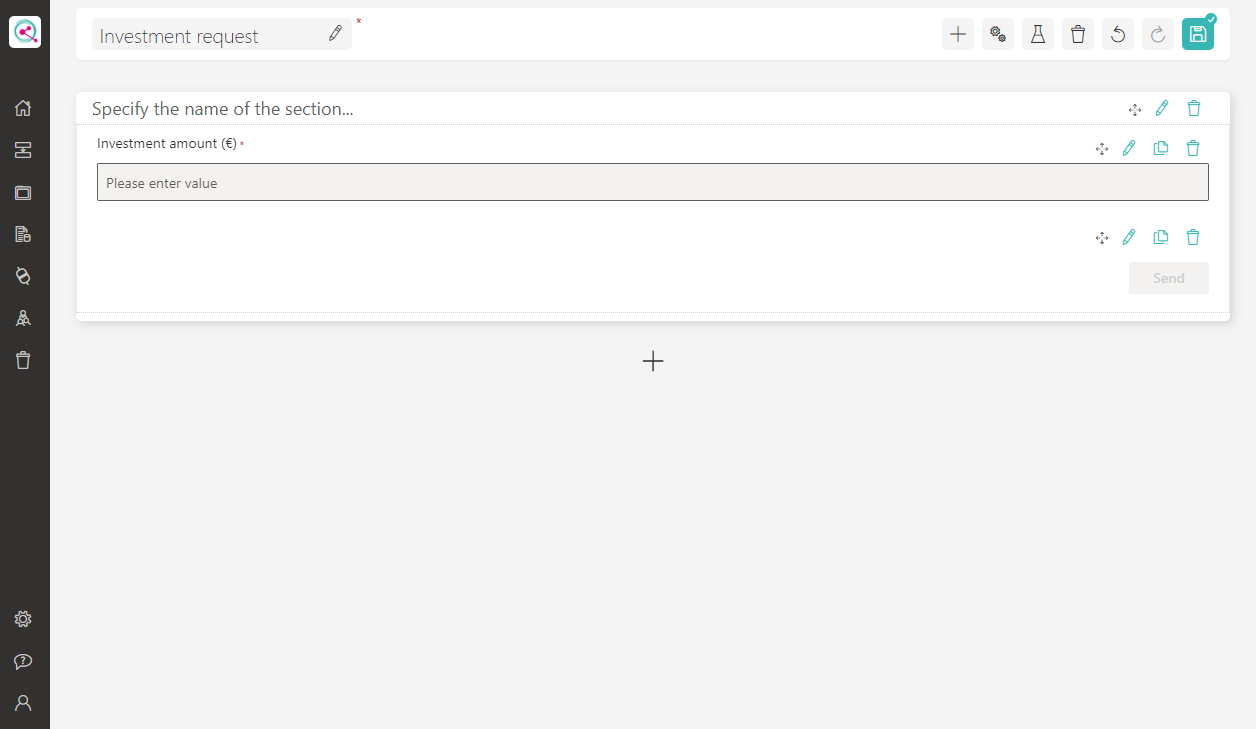
For the investment application, we need a single-line text field to specify the amount of the investment. In addition, a multi-line text field could make sense as a comment field, for example, you can simply drag this under the other field.
As soon as the new controls have been inserted, you can close the list of available controls by clicking the X above the list.
The following commands are available via the buttons on the right-hand side of the inserted controls:
- : You can use this button to change the order of the controls using drag'n'drop.
- : This button allows you to adjust the properties of the control element.
- : This button copies the corresponding control element and inserts the copy below it.
- : You can use this button to delete the control again.
Now use the Edit button to customize the single-line control. For example, you can enter the amount of the investment (€) as the title. You can also mark the field as a mandatory field using the corresponding button.
Finally, you should change the format to Number field to force a number to be entered.
Once you have made these settings, you can apply them by clicking the Apply button.
You can also rename the multi-line text field to Comment in the same way. You should then save the form.
Insert button
The form is now almost complete, but there is currently no option for users to submit the form. For this reason, you need to open the list of available controls again using the plus button on the top right-hand side.
Drag a button control under the previously inserted text field and close the list again using the X.
You can now rename the button in the same way as the other controls using the Edit button. In the settings, you can change the name of the button to e.g. Send using the first text field.
We do not need another button for this example, but you could insert a Cancel button or similar.
As soon as you have made these settings, you can apply the settings again with the Apply button.
Then save the form.
In almost all cases, you will need to insert at least one button in your form.

Users can use this button to trigger the next steps in the process. We will define these steps on the next page.