Process Step
A process in linqi consists of individual steps that are executed one after another when the process runs. In the process designer, these steps are displayed as nodes. There are two node types:
- Form node: At this point in the process, a form is filled out or edited.
- Action node: At this point in the process, an action is performed. The available actions are documented here.
On the right side of each node there is a downward arrow that opens the context menu of the node. The context menu is only displayed in edit mode, e.g. not for a published process version or a running process instance.
Form Node
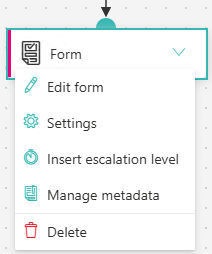
A form node is linked to a form from the Form Designer and displays the name of the form. Double-clicking the node opens the form in a new tab.
The following functions are available in the context menu of a form node:
- Edit form: Opens the linked form in the Form Designer in a new tab.
- Settings:
Opens the settings panel of the form node. There you define whether and how old values from a previous run are copied, e.g. in a correction loop. The following fields are available:- Copy old values:
Determines whether values from a previous run are copied automatically. By default, Do not copy is set. The following options are available:- Do not copy:
No old values are copied. - Same process step:
The values of exactly the same process step are copied. - Same form:
The values of the form are copied, regardless of the process step in which it was filled out.
- Do not copy:
- Recursively copy old values:
This field is only visible if old values are copied. If this option is activated, the values are also copied for embedded forms. If it is deactivated, the setting of the respective embedded form applies. - Copy read-only fields:
This field is only visible if old values are copied. If this option is activated, read-only fields are also copied. Otherwise they are ignored and any default values are used.
- Copy old values:
- Insert escalation level:
Adds an additional output to the form node that further steps can be connected to. The output is executed when the defined time of the escalation level is reached. If an escalation level already exists, the label reads Manage escalation level. The existing escalation level can then be edited or removed via the delete icon in the panel header.
The following fields are displayed in the corresponding panel:
- Display name (required field): The name of the escalation level. It is displayed in the process designer and also serves as the name of the additional output.
- Type of waiting time (required field):
Determines the method used to calculate the time at which the output is executed. The following options are available:
- Relative waiting time: A time span is waited starting from the current date, e.g. 14 days. The fields Number of days / months (required field), Ignore weekends and Days / Months are displayed.
- Placeholder date: The time is determined via a date placeholder, e.g. a date from a form field. The fields Date (required field, selection of a date placeholder), Added days / months (required field), Ignore weekends and Days / Months are displayed. A negative value for Added days / months subtracts the days or months from the date. The time (hours and minutes) can be used to further refine the time, provided the selected placeholder does not contain a time.
- Absolute date: A constant date is defined up to which the process waits. The fields Date (required field) and the time (hours and minutes) are displayed.
- Days / Months: Specifies whether the field Number of days / months or Added days / months is interpreted as days or months. The units Days and Months are available.
- Ignore weekends: If this option is enabled, weekends are ignored when calculating the waiting time. If the waiting time falls on a weekend, the process waits until the next business day instead.
- Manage metadata: Opens the metadata panel of the node. In the Metadata tab, the standard fields as well as your own extended fields can be maintained for the node. Additionally, the Comments and Documents tabs are available.
- Delete: Removes the form node from the process. Confirmation is requested before deletion.
Action Node
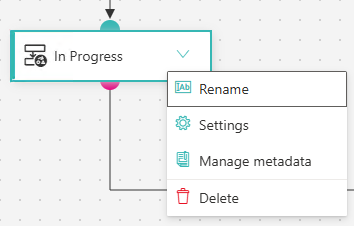
An action node performs an action, e.g. sending an email. The node displays the name of the action by default. Double-clicking the node opens the configuration of the action.
The following functions are available in the context menu of an action node:
- Rename: Renames the node directly in the process designer. The new name is confirmed with the Enter key or by clicking outside the name field.
- Settings: Opens the configuration of the action to edit the action.
- Manage metadata: Opens the metadata panel of the node. In the Metadata tab, the standard fields as well as your own extended fields can be maintained for the node. Additionally, the Comments and Documents tabs are available.
- Delete: Removes the action node from the process. Confirmation is requested before deletion.